Thursday 30 September 2021

Hybrid Managed Objects in ForgeRock IDM

Mappings

As you may be aware, ForgeRock IDM can store data in the repository using a 'generic' mapping, or an 'explicit' mapping - or anywhere inbetween. 

Generic means that any data is stored in a JSON blob (true for DS and Postgres repos - it's different for other DBs that don't handle JSON natively - but that's another topic entirely!)

Explicit means that any property in IDM must be explicitly mapped to an attribute in the underlying repository. 

By default, a standalone IDM uses generic for all managed objects. The following link describes explicit and generic mappings for DS repos: https://backstage.forgerock.com/docs/idm/7.1/objects-guide/explicit-generic-mapping.html#explicit-generic-mapping-ds 

Shared DS Repo

For 'shared repo' scenarios, an explicit mapping for the managed/user object is used. This is because ForgeRock AM doesn't understand JSON blobs in DS, so for AM to see users and attribute values IDM needs to use 'explicit'. The other managed objects aren't used by AM so IDM can still use generic mappings for those. 

repo.ds.json

It's repo.ds.json that controls the generic/explicit settings - and the platform setup guide for shared repo gets you to replace the default repo.ds.json with one that uses explicit mappings for managed/user (but generic mappings for other managed objects). 
Whilst this means that AM can now access the properties managed by IDM, the downside is that some flexibility is reduced. I can't simply modify the IDM managed user definition and expect it to work. I also have to change the DS schema and repo.ds.json mapping files. For production implementations this is generally a minor concern. But for prototyping and development purposes, it's a right royal...you know what! 
So, I generally switch my 'explicit' managed user mapping to a 'hybrid' managed user mapping. 

Hybrid mapping

This means that some properties in the managed user definition are explicitly mapped - so AM can use them, whereas anything else is 'generic'. Note that AM can't natively understand these generic properties - so it might not work for all situations. But it does mean I can easily change my IDM managed user definition to store additional properties. 

Caveat
I do this before I start IDM for the first time - so if you have already started storing data or making changes to config you may find some inconsistencies after doing this. I would always recommend starting afresh if possible. 


Let's look at the repo.ds.json file the Platform Setup guide references. At the time of writing, v7.1 is the latest and the guide references this: https://backstage.forgerock.com/docs/platform/7.1/resources/repo.ds.json Note there are 'explicitMapping' and 'genericMapping' blocks in the 'resourceMapping' block.
Diving into the 'explicitMapping' block we will see a 'managed/user' block:
If you expand the 'managed/user' block you will see the explicit mappings of IDM named properties to DS attribute names. (The DS attributes need to be defined in the DS schema - a topic for a different article! In this case, the attributes are present in the schema by virtue of DS setup profiles - yet another article!!) 
We need to move this 'managed/user' block to the 'genericMapping' block and then modify it to add the JSON property for storing additional IDM properties.  This is because 'hybrid' managed objects are better described as 'generic objects with some explicit property mappings'. 

So, cut and paste the entire 'managed/user' block into the 'genericMapping' block - it's over 200 lines - taking care to ensure you retain valid JSON (watch for missing/leftover commas!). I usually paste it in between the 'managed/*' and 'managed/role' blocks within the 'genericMapping' block. For example:
Ok, so now we need to make the changes to this block: 
  • Tell IDM which JSON attribute to use, and the JSON matching rule. To do this, add this within the 'managed/user' block:
"jsonAttribute" : "fr-idm-managed-user-custom-attrs", "jsonQueryEqualityMatchingRule" : "caseIgnoreJsonQueryMatch",
  • Add the objectClass that is the container for the JSON attribute To do this, add the following to the to the list of 'objectClasses' within the 'managed/user' block:
"fr-idm-managed-user-hybrid-obj"
 The result should look like this:

Note that we don't need to do anything with the 'properties' block - this will retain all of the AM specific explicit mappings for those properties. All we've done is tell IDM to store anything that isn't in the 'properties' section in the 'fr-idm-managed-user-custom-attrs' attribute. By the way, this attribute is already included in the DS schema through the setup profile - hence we don't need to change the DS schema. It's definition can be found here: https://backstage.forgerock.com/docs/ds/7.1/schemaref/at-fr-idm-managed-user-custom-attrs.html 


Now start IDM. You will be able to make IDM managed/user schema changes, and any data for those properties will now be stored in the JSON attribute.

Thursday 23 May 2019

Fuzzy Matching in IDM


Overview

Crumbs.  It's been a while since I last blogged!
I was recently working with a customer that asked if we had the capability to perform 'fuzzy' searching across the customer data that can be held in the ForgeRock Identity Platform.  In this case, the customer data was being managed in the ForgeRock Identity Management (IDM) component of the platform.  IDM requires an underlying datastore to hold the data, such as customer information.  IDM provides support for several different datastores, including PostgreSQL, MySQL, and ForgeRock Directory Services.  Each of these datastores have different approaches to storing and retrieving data which means they have differing query syntaxes.  IDM provides the developer an abstraction layer to these different technologies so that a consistent approach to storing and accessing data is provided.  It does this by translating RESTful IDM queries into datastore specific queries.  This translation is defined by a configuration file - a different one for each datastore technology supported.  The capability of the product allows basic querying with multiple fields, filtering, sorting and paging for large datasets.  The basic querying allows partial matches of data, for example, 'contains', 'starts with', 'less than', 'greater than' as well as equality.  This is great for most scenarios but does not offer 'fuzzy' matching.

What do I mean by 'fuzzy' matching?
Take the name 'Stephen' - is that the same, or different to 'Steven'?  Sara/Sarah?  Stuart/Stewart?  (I totally recommend watching this: https://www.youtube.com/watch?v=-n7gNLQoG6Y) Well of course they're different, but, as humans, we can also recognise that they sound the same despite being spelt differently.  
However computers don't naturally understand this nuance. If you ask it to find all people with the name Steven, it won't find people with the name Stephen.  Ok, well let's ask it to find everyone with the name that 'starts with' "Ste".  Great, we get everyone called Steven and Stephen.  And Stewart. And Stelios. And Stein. And Sterling…. you get the idea.

So what we need is fuzzy matching… everyone that sounds similar to 'Steven'.

Fuzzy Matching

Fortunately several methods have been devised to accommodate this.  Also, fortunately, several datastores provide native support for these methods.
Let's take one one of these methods: Soundex, and one of these datastores: PostgreSQL.
Firstly you need to enable fuzzy-matching in PostgreSQL by running this command in psql:
CREATE EXTENSION fuzzystrmatch;

Now we have access to fuzzy matching functions such as Soundex.  (See: https://www.postgresql.org/docs/9.6/fuzzystrmatch.html for the details on this extension and the other functions it offers)

So we can execute this query:
SELECT soundex('steven');
which returns the 4 character soundex code that represents 'steven':
S315

Compare that to:
SELECT soundex('stephen');
And note that the soundex code is identical:
S315

Also consider:
SELECT soundex('stelios');
And note the code is different:
S342

Now we can apply that to queries, for example:
SELECT * FROM customers WHERE soundex(firstName) = soundex('stephen');
This will return all customers that have firstName values that sound like 'stephen', which includes 'stephen' and 'steven', but not 'stelios'.

IDM Repo commands and parameterised queries

Great, how do we expose that in IDM?
Remember the configuration file that translates RESTful IDM queries into datastore specific queries?  Well, we're going to make use of that.
IDM exposes 'commands' defined within the configuration file on its REST endpoints.
IDM also supports parameterised queries on these repository commands. See here for more info: https://backstage.forgerock.com/docs/idm/6.5/integrators-guide/index.html#parameterized-queries

In the example from the link above we see that the repository configuration file has a 'parameterised command' defined: 
"query-all-ids" : "SELECT objectid FROM ${_dbSchema}.${_table} LIMIT ${int:_pageSize} OFFSET ${int:_pagedResultsOffset}",

And therefore, to reference this command on the REST endpoint you use this query string:
?_queryId=query-all-ids

Because it is parametrised the URL indicates the managed object on which this query should run, so this command would be called similar to this:
curl  --header "X-OpenIDM-Username: openidm-admin"  --header "X-OpenIDM-Password: openidm-admin"  "http://localhost:8080/openidm/managed/user?_queryId=query-all-ids"

In this case, the query would run against the managed user objects.  But the same query could be called like this:
curl  --header "X-OpenIDM-Username: openidm-admin"  --header "X-OpenIDM-Password: openidm-admin"  "http://localhost:8080/openidm/managed/role?_queryId=query-all-ids"
which would query managed roles instead.

What this means is that we can expose native datastore queries as 'parameterised commands' through the REST interface in a supported way.
So we need to put these two concepts together.  Let's write a parameterised command that leverages soundex which is then exposed through the REST interface.

Putting it together

Firstly, I'm going to assume a generic schema in the IDM repository, rather than fixed (for the definition, see here: https://backstage.forgerock.com/docs/idm/6.5/integrators-guide/index.html#explicit-generic-mapping)

Also note that as PostgreSQL supports JSON fields natively, and IDM makes use of this, when querying the IDM tables we need to take this into account.  For other datastores (for example MySQL, IDM uses separate property tables for searchable fields).
I also want to allow the calling application to decide which property on the managed object that should be searched for a fuzzy match.

So this is the definition of the parameterised query added as a command to the repository configuration file for PostgreSQL:
"fuzzy-match" : "SELECT * FROM ${_dbSchema}.${_mainTable} obj INNER JOIN ${_dbSchema}.objecttypes objtype ON objtype.id = obj.objecttypes_id WHERE soundex(json_extract_path_text(fullobject, ${propertyName})) = soundex(${propertyValue}) AND objtype.objecttype = ${_resource} LIMIT ${int:_pageSize} OFFSET ${int:_pagedResultsOffset}"
See how it uses the 'json_extract_path_text' function - this is part of the native JSON functionality in PostgreSQL.  Simply add this to the IDM repo configuration file.

And this is how you call it from curl:
curl -H "X-OpenIDM-Password: openidm-admin" -H "X-OpenIDM-Username: openidm-admin" "http://localhost:8080/openidm/managed/user?_queryId=fuzzy-match&propertyName=givenName&propertyValue='steven'"

Simples!

You may wish to refine this query to use different fuzzy algorithms, or maybe take account of the 'difference' function in PostgreSQL (which would enable matching 'steve' and 'steven').  It's also worth noting that the syntax for different datastores will be different so the actual query you write is up to you.  The point is that there is a supported and documented way of exposing that query as a RESTful API.

Pretty cool huh!


Thursday 16 November 2017

Using IDM and DS to synchronise hashed passwords

Overview

In this post I will describe a technique for synchronising a hashed password from ForgeRock IDM to DS.
Out of the box, IDM has a Managed User object that encrypts a password in symmetric (reversible) encryption.  One reason for this is that sometimes it is necessary to pass, in clear text, the password to a destination directory in order for it to perform its own hashing before storing it.  Therefore the out of the box synchronisation model for IDM is take the encrypted password from its own store, decrypt it, and pass it in clear text (typically over a secure channel!) to DS for it to hash and store.
You can see this in the samples for IDM.

However, there are some times when storing an encrypted, rather than hashed, value for a password is not acceptable.  IDM includes the capability to hash properties (such as passwords) not just encrypt them.  In that scenario, given that password hashes are one way, it's not possible to decrypt the password before synchronisation with other systems such as DS.

Fortunately, DS offers the capability of accepting pre-hashed passwords so IDM is able to pass the hash to DS for storage.  DS obviously needs to know this value is a hash, otherwise it will try to hash the hash!

So, what are the steps required?

  1. Ensure that DS is configured to accept hashed passwords.
  2. Ensure the IDM data model uses 'Hashing' for the password property.
  3. Ensure the IDM mapping is setup correctly


Ensure DS is configured to accept hashed passwords

This topic is covered excellently by Mark Craig in this article here:

I'm using ForgeRock DS v5.0 here, but Mark references the old name for DS (OpenDJ) because this capability has been around for a while.  The key thing to note about the steps in the article is that you need the allow-pre-encoded-passwords advanced password policy property to be set for the appropriate password policy.  I'm only going to be dealing with one password policy - the default one - so Mark's article covers everything I need.

(I will be using a Salted SHA-512 algorithm so if you want to follow all the steps, including testing out the change of a user's password, then specify {SSHA512} in the userPassword value, rather than {SSHA}.  This test isn't necessary for the later steps in this article, but may help you understand what's going on).


Ensure IDM uses hashing

Like everything in IDM, you can modify configuration by changing the various config .json files, or the UI (which updates the json config files!)
I'll use IDM v5.0 here and show the UI.

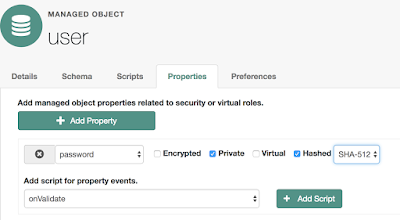
By default, the Managed User object includes a password property that is defined as 'Encrypted':
We need to change this to be Hashed:


And, I'm using the SHA-512 algorithm here (which is a Salted SHA-512 algorithm).

Note that making this change does not update all the user passwords that exist.  It will only take effect when a new value is saved to the property.

Now the value of a password, when it is saved, is string representation of a complex JSON object (just like it is when encrypted) but will look something like:
{"$crypto":
  {"value":
    {"algorithm":"SHA-512","data":"Quxh/PEBXMa2wfh9Jmm5xkgMwbLdQfytGRy9VFP12Bb5I2w4fcpAkgZIiMPX0tcPg8OSo+UbeJRdnNPMV8Kxc354Nj12j0DXyJpzgqkdiWE="},
    "type":"salted-hash"
  }
}


Ensure IDM Mapping is setup correctly

Now we need to configure the mapping.
As you may have noted in the 1st step, DS is told that the password is pre-hashed by the presence of {SSHA512} at the beginning of the password hash value.  Therefore we need a transformation script that takes the algorithm and hash value from IDM and concatenates it in a way suited for DS.
The script is fairly simple, but does need some logic to convert the IDM algorithm representation: SHA-512 into the DS representation: {SSHA512}
This is the transformation script (in groovy) I used (which can be extended of course for other algorithms):
String strHash;
if (source.$crypto.value.algorithm == "SHA-512" ) {
  strHash = "{SSHA512}" + source.$crypto.value.data
}
strHash;

This script replaces the default IDM script that does the decryption of the password.
(You might want to extend the script to cope with both hashed and encrypted values of passwords if you already have data.  Look at functions such as openidm.isHashed and openidm.isEncrypted in the IDM Integrators Guide).

Now when a password is changed, the password is stored in hashed form in IDM.  Then the mapping is triggered to synchronise to DS applying the transformation script that passes the pre-hashed password value.

Now there is no need to store passwords in reversible encryption!

Wednesday 21 June 2017

ForgeRock Self-Service Custom Stage

Introduction

A while ago I blogged an article describing how to add custom stages to the ForgeRock IDM self-service config.  At the time I used the sample custom stage available from the ForgeRock Commons Self-Service code base.  I left it as a task for the reader to build their own stage!  However, I recently had cause to build a custom stage for a proof of concept I was working on.

It's for IDM v5 and I've detailed the steps here.

Business Logic

The requirement for the stage was to validate that a registering user had ownership of the provided phone number.  The phone number could be either a mobile or a landline.  The approach taken was to use Twilio (a 3rd party) to send out either an SMS to a mobile, or text-to-speech to a landline.  The content of the message is a code based on HOTP.

Get the code for the module

https://stash.forgerock.org/users/andrew.potter/repos/twilio-stage/browse

Building the module

Follow the instructions in README.md

After deploying the .jar file you must restart IDM for the bundle to be correctly recognised.

The module is targeted for IDMv5.  It uses the maven repositories to get the binary dependencies.
See this article in order to access the ForgeRock 'private-releases' maven repo:
https://backstage.forgerock.com/knowledge/kb/article/a74096897

It also uses appropriate pom.xml directives to ensure the final .jar file is packaged as an OSGi bundle so that it can be dropped into IDM

Technical details

The code consists of a few files.  The first two in this list a the key files for any stage.  They implement the necessary interfaces for a stage.  The remaining files are the specific business logic for this stage.
  • TwilioStageConfig.java.  This class manages reading the configuration data from the configuration file.  It simply represents each configuration item for the stage as properties of the class.
  • TwilioStage.java.  This is main orchestration file for the stage.  It copes with both registration and password reset scenarios.  It manages the 'state' of the flow within this stage and generates the appropriate callbacks to user, but relies on the other classes to do the real code management work.  If you want to learn about the way a 'stage' works then this is file to consider in detail.
  • HOTPAlgorithm.java.  This is taken from the OATH Initiative work and is unchanged by me.  It is a java class to generate a code based on the HOTP algorithm.
  • TwilioService.java. This class manages the process of sending the code.  It generates the code then decides whether to send it using SMS or TTS.  (In the UK, all mobile phone numbers start 07... so it's very simple logic for my purpose!)  This class also provides a method to validate the code entered by the user.  
  • TwilioUtil.java.  The class provides the utility functions that interact directly with the Twilio APIs for sending either an SMS or TTS

Configuration

There are also two sample config files for registration and password reset.  You should include the JSON section relating to this class in your self-service configuration files for IDM.
For example:
        {
            "class" : "org.forgerock.selfservice.twilio.TwilioStageConfig",
            "codeValidityDuration" : "6000",
            "codeLength" : "5",
            "controlUrl" : "http://twimlets.com/message?Message%5B0%5D=Hello%20Please%20enter%20the%20following%20one%20time%20code",
            "fromPhone" : "+441412803033",
            "accountSid" : "<Enter accountSid>",
            "tokenId" : "<Enter tokenId>",
            "telephoneField" : "telephoneNumber",
            "skipSend" : false
        },

Most configuration items should be self explanatory.  However, the 'skipSend' option is worthy of special note.  This, when true, will cause the stage to avoid calling the Twilio APIs and instead return the code as part of the callback data.  This means that if you're using the OOTB UI then the 'placeholder' HTML attribute of the input box will tell you the code to enter.  This is really useful for testing this stage if you don't have access to a Twilio account as this also ignores the Twilio account specific configuration items.

Of course, now you need to deploy it as per my previous article!

Thursday 17 November 2016

Calling external REST endpoints in OpenAMv13.5 scripted authorization policies

Summary

It is often useful to be able to call external services as part of an authorisation policy in OpenAM.  One such example is a policy that does a check to see if the IP address of the calling user is located in the same country as the registered address for the user.  Now, there's an out of the box scripted policy condition that does just this that relies on external services it calls using 'GET' requests.  I thought it might be nice to add some functionality to this policy that sent me a text message (SMS) when the policy determined that it was being evaluated from an IP address from a country other than my own.  This could act as a warning to me that my account has been compromised and is being used by someone else, somewhere else in the world.  A colleague had also been doing a little bit of integration work with Twilio who happen to provide RESTful endpoints for sending SMS so I decided to adopt Twilio for this purpose.  That Twilio is the endpoint here is of little consequence as this approach will work for any service provider, but it gave me a real service for SMS notifications.

The solution

Well, that's easy isn't it... there's a Developers Guide that explains the scripting API for OpenAM: https://backstage.forgerock.com/#!/docs/openam/13.5/dev-guide#scripting-api
We just use that, looking at how the existing external calls work in the policy, and we're done, right?
Err, no, wrong, as it turns out!
Tried that and it didn't work :(

The problem

The Twilio endpoint requires a POST of data including an Authorization and Content-Type header.  This should be fine.  But the httpClient.post method as described in the guide simply wouldn't send the required HTTP headers.
It turns out the 'post' and 'get' methods uses RESTlet under the covers which has very specific methods for including standardised HTTP headers.  Unfortunately these methods aren't exposed by the httpClient object available in the script.  The OpenAM developer documentation suggests that you should just be able to set these as headers in the 'requestdata' parameter but as the underlying code does not use the specific RESTlet methods for adding these then the RESTlet framework discards them.

As an example, from the guide, you might try to write code like this:
var response = httpClient.post("http://example.com:8080/openam/json/users/" + username, "", { cookies:[ { "domain": ".example.com", "field": "iPlanetDirectoryPro", "value": "E8cDkvlad83kd....KDodkIEIx*DLEDLK...JKD09d" } ], headers:[ { "field": "Content-Type", "value": "application/json" } ] });

If you do, then you'll see that the Content-Type header is not sent because it is considered standard.  However, if the header was a custom header then it would be passed to the destination.

The other thing you might notice in the logs is that the methods indicated by the developer guide are now marked as deprecated.  They still work - to a fashion - but an alternative method 'send' is recommended.  Unfortunately the guides don't describe this method...hence this blog post!

The real solution

So the real solution is to use the new 'send' method of the httpClient object.  This accepts one parameter 'request' which is defined as the following type:

    org.forgerock.http.protocol.Request

So within our script we should define a Request object and set the appropriate parameters before passing it as a parameter to the httpClient.send method.

Great, easy right? Well, err, that depends...

As I was using a copy of the default policy authorization script this was defined as Javascript.  So I needed to import the necessary class using Javascript.  And, as I discovered, I was using Java8 which changed the engine from Rhino to Nashorn which recommends the 'JavaImporter' mechanism for importing packages

So, with this is at the top of my script:
    var fr = new JavaImporter(org.forgerock.http.protocol)

I can now instantiate a new Request object like this:
    with (fr) {
      var request = new fr.Request();
    } 
Note the use of the 'with' block.

Now I can set the necessary properties of the request object so that I can call the Twilio API.  This API requires the HTTP headers specified, to be POSTed, with url-encoded body contents that describe the various details of the message Twilio will issue.  All this needs to be done within the 'with' block highlighted above:
    request.method = 'POST';
    request.setUri("https://twilio-url/path/resource");
    request.getHeaders().add('Content-Type', 'application/x-www-form-urlencoded');
    request.getHeaders().add('Authorization', 'Basic abcde12345');
    request.setEntity("url%20encoded%20body%20contents");

Ok, so now I can send my request parameter?
Well, yes, but I also need to handle the response, which for the 'send' method is a Promise (defined as org.forgerock.util.promise.Promise) for a Response object (defined as org.forgerock.http.protocol.Response)

So this is another package I need to import into my Javascript file in order to access the Promise class.  JavaImporter takes multiple parameters to make them all available to the assigned variable so you can use them all within the same 'with' block.  Therefore my import line now looks like:
 var fr = new JavaImporter(org.forgerock.http.protocol, org.forgerock.util.promise)

And, within the 'with' block, I now include:
    promise = httpClient.send(request);
    var response = promise.get();

Which will execute the desired external call and return the response into the response variable.

So now I can use the Response properties and methods to check the call was successful e.g:
     response.getStatus();
     response.getCause();

So my script for calling an external service looks something like this:
var fr = new JavaImporter(org.forgerock.http.protocol, org.forgerock.util.promise)
function postSMS() {
  with (fr) {
    var request = new Request();
    request.method = 'POST';
    request.setUri("https://twilio-url/path/resource");
    request.getHeaders().add('Content-Type', 'application/x-www-form-urlencoded');
    request.getHeaders().add('Authorization', 'Basic abcde12345');
    request.setEntity("url%20encoded%20body%20contents");
    promise = httpClient.send(request);
    var response = promise.get();
    logger.message("Twilio Call. Status: " + response.getStatus() + ", Cause: " + response.getCause());
  }
postSMS();

Great, so we're done now?

Well, almost!

The various classes defined by the imported packages are not all 'whitelisted'. This is an OpenAM feature that controls which classes can be used within scripts. We therefore need to add the necessary classes to the 'whitelist' for Policy scripts which can be in the Global Services page of the admin console. As you run the script you'll see the log files will produce an error if the necessary class is not whitelisted. You can use this approach to see what is required then add the highlighted class to the list.

And, now we're done... happy RESTing!

Wednesday 27 July 2016

Fun with OpenAM13 Authz Policies over REST - the ‘jwt’ parameter of the ‘Subject’


Summary

I've previously blogged about the 'claims' and 'ssoToken' parameters of the 'subject' item used in the REST call to evaluate a policy for a resource. These articles are:
Now we're going to look at the 'jwt' parameter.  

For reference, the REST call we'll be using is documented in the developer guide, here:

The 'JWT' Parameter

The documentation describes the 'jwt' paramter as:
The value is a JWT string
What does that mean?
Firstly, it's worth understanding the JWT specification: RFC7519
To summarise, a JWT is a URL-safe encoded, signed (and possibly encrypted) representation of a 'JWT Claims Set'. The JWT specification defines the 'JWT Claims Set' as:
A JSON object that contains the claims conveyed by the JWT.

Where 'claims' are name/value pairs about the 'subject' of the JWT.  Typically a 'subject' might be an identity representing a person, and the 'claims' might be attributes about that person such as their name, email address, and phone number etc

So a JWT is generic way of representing a subject's claims.

OpenID Connect (OIDC)

OIDC makes use of the JWT specification by stating that the id_token must be a JWT.  It also defines a set of claims that must be present within the JWT when generated by an OpenID Provider  See: http://openid.net/specs/openid-connect-core-1_0.html#IDToken

The specification also says that additional claims may be present in the token.  Just hang on to that thought for the moment...we'll come back to it.

OpenAM OIDC configuration

For the purposes of investigating the 'jwt' parameter, let's configure OpenAM to generate OIDC id_tokens.  I'm not going to cover that here, but we'll assume you've followed the wizard to setup up an OIDC provider for the realm.  We'll also assume you've created/updated the OAuth2/OIDC Client Agent profile to allow the 'profile' and 'openid' scopes.  I'm also going to use an 'invoices' scope so the config must allow me to request that too.

Now I can issue:
curl --request POST --user "apiclient:password" --data "grant_type=password&username=bob&password=password&scope=invoices openid profile" http://as.uma.com:8080/openam/oauth2/access_token?realm=ScopeAz

Note the request for the openid and profile scopes in order to ensure I get the OpenID Connect response.

And I should get something similar to the following:
{
  "access_token":"0d0cbd2a-c99c-478a-84c9-78463ec16ad4",
  "scope":"invoices openid profile",
  "id_token":"eyAidHlwIjogIkpXVCIsICJraWQiOiAidWFtVkdtRktmejFaVGliVjU2dXlsT2dMOVEwPSIsICJhbGciOiAiUlMyNTYiIH0.eyAiYXRfaGFzaCI6ICJVbmFHMk0ydU5kS1JZMk5UOGlqcFRRIiwgInN1YiI6ICJib2IiLCAiaXNzIjogImh0dHA6Ly9hcy51bWEuY29tOjgwODAvb3BlbmFtL29hdXRoMi9TY29wZUF6IiwgInRva2VuTmFtZSI6ICJpZF90b2tlbiIsICJhdWQiOiBbICJhcGljbGllbnQiIF0sICJvcmcuZm9yZ2Vyb2NrLm9wZW5pZGNvbm5lY3Qub3BzIjogIjhjOWNhNTU3LTk0OTgtNGU2Yy04ZjZmLWY2ZjYwZjNlOWM4NyIsICJhenAiOiAiYXBpY2xpZW50IiwgImF1dGhfdGltZSI6IDE0NjkwMjc1MTMsICJyZWFsbSI6ICIvU2NvcGVBeiIsICJleHAiOiAxNDY5MDMxMTEzLCAidG9rZW5UeXBlIjogIkpXVFRva2VuIiwgImlhdCI6IDE0NjkwMjc1MTMgfQ.MS6jnMoeQ19y1DQky4UdD3Mqp28T0JYigNQ0d0tdm04HjicQb4ha818qdaErSxuKyXODaTmtqkGbBnELyrckkl7m2aJki9akbJ5vXVox44eaRMmQjdm4EcC9vmdNZSVORKi1gK6uNGscarBBmFOjvJWBBBPhdeOPKApV0lDIzX7xP8JoAtxCr8cnNAngmle6MyTnVQvhFGWIFjmEyumD6Bsh3TZz8Fjkw6xqOyYSwfCaOrG8BxsH4BQTCp9FgsEjI52dZd7J0otKLIk0EVmZIkI4-hgRIcrM1Rfiz9LMHvjAWY97JBMcGBciS8fLHjWWiLDqMHEE0Wn5haYkMSsHYg",
  "token_type":"Bearer",
  "expires_in":3599
}

Note the lengthy id_token field.  This is the OIDC JWT made up according to the specification.  Also note that, by default, OpenAM will sign this JWT with the 1024-bit 'test' certificate using the RS256 algorithm.  I've updated my instance to use a new 2048-bit certificate called 'test1' so my response will be longer than the default.  I've used a 2048-bit certificate because I want to use this tool to inspect the JWT and its signature: http://kjur.github.io/jsjws/tool_jwt.html.  And, this tool only seems to support 2048-bit certificates which is probably due to the JWS specification   (I could have used jwt.io to inspect the JWT, but this does not support verification of RSA based signatures).

So, in the JWT tool linked above you can paste the full value of the id_token field into 'Step 3', then click the 'Just Decode JWT' button.  You should see the decode JWT claims in the 'Payload' box:

You can also see that the header field shows how the signature was generated in order to allow clients to verify this signature.
In order to get this tool to verify the signature, you need to get the PEM formatted version of the public key of the signing certificate.  i.e. 'test1' in my case.
I've got this from the KeyStoreExplorer tool, and now I can paste it into the 'Step 4' box, using the 'X.509 certificate for RSA' option.  Now I can click 'Verify It':

The tool tells me the signature is valid, and also decodes the token as before.  If I was to change the content of the message, of the signature of the JWT then the tool would tell me that the signature is not valid. For example, changing one character of the message would return this:

Note that the message box says that the signature is *Invalid*, as well as the Payload now being incorrect.

The 'jwt' Parameter 

So now we've understood that the id_token field of the OIDC response is a JWT, we can use this as the 'jwt' parameter of the 'subject' field in the policy evaluation call.

For example, a call like this:
curl --request POST --header "iPlanetDirectoryPro: AQIC5wM2LY4Sfcx-sATGr4BojcF5viQOrP-1IeLDz2Un8VM.*AAJTSQACMDEAAlNLABQtMjUwMzE4OTQxMDA1NDk1MTAyNwACUzEAAA..*" --header "Content-Type: application/json" --data '{"resources":["invoices"],"application":"api","subject":{"jwt":"eyAidHlwIjogIkpXVCIsICJraWQiOiAidWFtVkdtRktmejFaVGliVjU2dXlsT2dMOVEwPSIsICJhbGciOiAiUlMyNTYiIH0.eyAiYXRfaGFzaCI6ICJVbmFHMk0ydU5kS1JZMk5UOGlqcFRRIiwgInN1YiI6ICJib2IiLCAiaXNzIjogImh0dHA6Ly9hcy51bWEuY29tOjgwODAvb3BlbmFtL29hdXRoMi9TY29wZUF6IiwgInRva2VuTmFtZSI6ICJpZF90b2tlbiIsICJhdWQiOiBbICJhcGljbGllbnQiIF0sICJvcmcuZm9yZ2Vyb2NrLm9wZW5pZGNvbm5lY3Qub3BzIjogIjhjOWNhNTU3LTk0OTgtNGU2Yy04ZjZmLWY2ZjYwZjNlOWM4NyIsICJhenAiOiAiYXBpY2xpZW50IiwgImF1dGhfdGltZSI6IDE0NjkwMjc1MTMsICJyZWFsbSI6ICIvU2NvcGVBeiIsICJleHAiOiAxNDY5MDMxMTEzLCAidG9rZW5UeXBlIjogIkpXVFRva2VuIiwgImlhdCI6IDE0NjkwMjc1MTMgfQ.MS6jnMoeQ19y1DQky4UdD3Mqp28T0JYigNQ0d0tdm04HjicQb4ha818qdaErSxuKyXODaTmtqkGbBnELyrckkl7m2aJki9akbJ5vXVox44eaRMmQjdm4EcC9vmdNZSVORKi1gK6uNGscarBBmFOjvJWBBBPhdeOPKApV0lDIzX7xP8JoAtxCr8cnNAngmle6MyTnVQvhFGWIFjmEyumD6Bsh3TZz8Fjkw6xqOyYSwfCaOrG8BxsH4BQTCp9FgsEjI52dZd7J0otKLIk0EVmZIkI4-hgRIcrM1Rfiz9LMHvjAWY97JBMcGBciS8fLHjWWiLDqMHEE0Wn5haYkMSsHYg"}}' http://as.uma.com:8080/openam/json/ScopeAz/policies?_action=evaluate

might return:
[
  {
    "ttl":9223372036854775807,
    "advices":{},
    "resource":"invoices",
    "actions":{"permit":true},
    "attributes":{"hello":["world"]}
  }
]

This assumes the following policy definition:


Note that in this case I am using the 'iss' claim within the token in order to ensure I trust the issuer of the token when evaluating the policy condition.

As mentioned in \vious articles, it is imperative that the id_token claims includes a 'sub' field.  Fortunately, the OIDC specification makes this mandatory so using an OIDC token here will work just fine.

It's also worth noting that OpenAM does *not* verify the signature of the id_token submitted in 'jwt' field.  This means that you could shorten the 'curl' call above to remove the signature component of the 'jwt'. For example, this works just the same as above:
curl --request POST --header "iPlanetDirectoryPro: AQIC5wM2LY4Sfcx-sATGr4BojcF5viQOrP-1IeLDz2Un8VM.*AAJTSQACMDEAAlNLABQtMjUwMzE4OTQxMDA1NDk1MTAyNwACUzEAAA..*" --header "Content-Type: application/json" --data '{"resources":["invoices"],"application":"api","subject":{"jwt":"eyAidHlwIjogIkpXVCIsICJraWQiOiAidWFtVkdtRktmejFaVGliVjU2dXlsT2dMOVEwPSIsICJhbGciOiAiUlMyNTYiIH0.eyAiYXRfaGFzaCI6ICJVbmFHMk0ydU5kS1JZMk5UOGlqcFRRIiwgInN1YiI6ICJib2IiLCAiaXNzIjogImh0dHA6Ly9hcy51bWEuY29tOjgwODAvb3BlbmFtL29hdXRoMi9TY29wZUF6IiwgInRva2VuTmFtZSI6ICJpZF90b2tlbiIsICJhdWQiOiBbICJhcGljbGllbnQiIF0sICJvcmcuZm9yZ2Vyb2NrLm9wZW5pZGNvbm5lY3Qub3BzIjogIjhjOWNhNTU3LTk0OTgtNGU2Yy04ZjZmLWY2ZjYwZjNlOWM4NyIsICJhenAiOiAiYXBpY2xpZW50IiwgImF1dGhfdGltZSI6IDE0NjkwMjc1MTMsICJyZWFsbSI6ICIvU2NvcGVBeiIsICJleHAiOiAxNDY5MDMxMTEzLCAidG9rZW5UeXBlIjogIkpXVFRva2VuIiwgImlhdCI6IDE0NjkwMjc1MTMgfQ."}}' http://as.uma.com:8080/openam/json/ScopeAz/policies?_action=evaluate

Note that the 'jwt' string needs to have two dots '.' in it to conform to the JWT specification.  The content following the second dot is the signature, which has been removed entirely in this second curl example.  i.e. this is an unsigned-JWT which is completely valid.

But, just to prove that OpenAM does *not* validate signed JWTs, you could attempt a curl call that includes garbage for the signature.  For example:
curl --request POST --header "iPlanetDirectoryPro: AQIC5wM2LY4Sfcx-sATGr4BojcF5viQOrP-1IeLDz2Un8VM.*AAJTSQACMDEAAlNLABQtMjUwMzE4OTQxMDA1NDk1MTAyNwACUzEAAA..*" --header "Content-Type: application/json" --data '{"resources":["invoices"],"application":"api","subject":{"jwt":"eyAidHlwIjogIkpXVCIsICJraWQiOiAidWFtVkdtRktmejFaVGliVjU2dXlsT2dMOVEwPSIsICJhbGciOiAiUlMyNTYiIH0.eyAiYXRfaGFzaCI6ICJVbmFHMk0ydU5kS1JZMk5UOGlqcFRRIiwgInN1YiI6ICJib2IiLCAiaXNzIjogImh0dHA6Ly9hcy51bWEuY29tOjgwODAvb3BlbmFtL29hdXRoMi9TY29wZUF6IiwgInRva2VuTmFtZSI6ICJpZF90b2tlbiIsICJhdWQiOiBbICJhcGljbGllbnQiIF0sICJvcmcuZm9yZ2Vyb2NrLm9wZW5pZGNvbm5lY3Qub3BzIjogIjhjOWNhNTU3LTk0OTgtNGU2Yy04ZjZmLWY2ZjYwZjNlOWM4NyIsICJhenAiOiAiYXBpY2xpZW50IiwgImF1dGhfdGltZSI6IDE0NjkwMjc1MTMsICJyZWFsbSI6ICIvU2NvcGVBeiIsICJleHAiOiAxNDY5MDMxMTEzLCAidG9rZW5UeXBlIjogIkpXVFRva2VuIiwgImlhdCI6IDE0NjkwMjc1MTMgfQ.garbage!!"}}' http://as.uma.com:8080/openam/json/ScopeAz/policies?_action=evaluate
...would still successfully be authorised.

It's also worth noting that the id_token claims of an OIDC token includes an 'exp' field signifying the 'expiry time' of the id_token.  OpenAM does not evaluate this field in this call.

Signature Verification

You might be wondering if it is possible to verify the signature and other aspects, such as the 'exp' field.  Yes, it is!  With a little bit clever scripting - of course!

The first thing is that we need to ensure that jwt token can be parsed by a script.  Unfortunately, simply passing it in the jwt parameter does not permit this.  But, we can *also* pass the jwt token in the 'environment' field of the policy decision request.  I'll shorten the jwt tokens in the following CURL command to make it easier to read, but you should supply the full signed jwt in the 'environment' field:
curl --request POST --header "iPlanetDirectoryPro: "AQIC....*" --header "Content-Type: application/json" --data '{"resources":["invoices"],"application":"api","subject":{"jwt":"eyAidHlw...MyNTYiIH0.eyAiYXRfa...MTMgfQ.MS6jn...sHYg"},"environment":{"jwt":["eyAidHlw...MyNTYiIH0.eyAiYXRfa...MTMgfQ.MS6jn...sHYg"]}}' http://as.uma.com:8080/openam/json/ScopeAz/policies?_action=evaluate

Note in this that the 'environment' field now includes a 'jwt' field whose data can be utilised in a script.  And what would such a policy condition script look like?
Well head over to https://github.com/smof/openAM_scripts and take a look at the 'ExternalJWTVerifier.groovy' script.  The associated blogpost from my colleague, Simon Moffatt, will set this script into context: http://identityrelationshipmanagement.blogspot.co.uk/2016/05/federated-authorization-using-3rd-party.html.  This will validate either an HMAC signed JWT - if you enter the appropriate shared secret - as well as an RSA 256 signed OIDC JWT - if you specify the jwk_uri for the OpenID Connect Provider.
And, now that you have claims accessible to the scripting engine you can pretty much apply any form of logic to them to validate the token - including validating the 'exp' field.


Tuesday 19 July 2016

Fun with OpenAM13 Authz Policies over REST - the ‘ssoToken’ parameter of the ‘Subject’

I recently blogged about the using the 'claims' parameter of the subject item in a REST call for policy evaluation in OpenAM 13.  (See http://yaunap.blogspot.co.uk/2016/07/fun-with-openam13-authz-policies-over.html). In that article I blithely stated that using the 'ssoToken' parameter was fairly obvious.  However, I thought I'd take the time to explore this in a little more detail to ensure my understanding is complete.  This is partly because I started thinking about OIDC JWT tokens, and the fact that OpenAM stateless sessions (nothing to do with OIDC) also use JWT tokens.

Let's first ensure we understand stateful and stateless sessions.
(It's documented here, in the Admin guide: https://backstage.forgerock.com/#!/docs/openam/13.5/admin-guide#chap-session-state)

Stateful sessions are your typical OpenAM session.  When a user successfully authenticates with OpenAM they will establish a session.  A Stateful session means that all the details about that session are held by the OpenAM server-side services.  By default, this is 'in-memory', but can be persisted to an OpenDJ instances in order to support high-availability and scalability across geographically disperse datacentres.  The client of the authentication request receives a session identifier, typically stored by a web application as a session cookie, that is passed back to the OpenAM servers so that the session details can be retrieved.  It's called 'stateful' because the server needs to maintain the state of the session.
A session identifier for a stateful session might look something like this:
AQIC5wM2LY4Sfcw4EfByyKNoSnml3Ngk0bxcJa-LD-qrwSc.*AAJTSQACMDEAAlNLABM3NzI1Nzk4NDU0NTIyMTczODA2AAJTMQAA*
Basically, it's just a unique key to the session state.

Stateless sessions are new in OpenAM 13.  These alleviate the need for servers to maintain and store state, which avoids the need to replicate persisted state across multiple datacentres.  Of course, there is still session 'state'...it's just no longer stored on the server.  Instead all state information is packaged up into a JWT and passed to the client to maintain.  Now, on each request, the client can send the complete session information back to an OpenAM server in order for it to be processed.  OpenAM does not need to perform a lookup of the session information from the stateful repository because all the information is right there in the JWT.  This means that for a realm configured to operate with stateless sessions, the client will receive a much bigger token on successful authentication
Therefore, a stateless session token might look something like:
AQIC5wM2LY4Sfcx_OSZ6Qe07K0NShFK6hZ2LWb6Pn2jNBTs.*AAJTSQACMDEAAlNLABMzMjQ1MDI5NDA0OTk0MjQyMTY0AAJTMQAA*eyAidHlwIjogIkpXVCIsICJhbGciOiAiSFMyNTYiIH0.eyAic2VyaWFsaXplZF9zZXNzaW9uIjogIntcInNlY3JldFwiOlwiM2M0NzczYzQtM2ZkZS00MjI2LTk4YzctMzNiZGQ5OGY2MjU0XCIsXCJleHBpcnlUaW1lXCI6MTQ2ODg2MTk3NTE0OCxcImxhc3RBY3Rpdml0eVRpbWVcIjoxNDY4ODU0Nzc1MTQ4LFwic3RhdGVcIjpcInZhbGlkXCIsXCJwcm9wZXJ0aWVzXCI6e1wiQ2hhclNldFwiOlwiVVRGLThcIixcIlVzZXJJZFwiOlwiYm9iXCIsXCJGdWxsTG9naW5VUkxcIjpcIi9vcGVuYW0vVUkvTG9naW4_cmVhbG09U2NvcGVBelwiLFwic3VjY2Vzc1VSTFwiOlwiL29wZW5hbS9jb25zb2xlXCIsXCJjb29raWVTdXBwb3J0XCI6XCJ0cnVlXCIsXCJBdXRoTGV2ZWxcIjpcIjVcIixcIlNlc3Npb25IYW5kbGVcIjpcInNoYW5kbGU6QVFJQzV3TTJMWTRTZmN3bG9wOHFRNFpydmZfY2N1am85VlZCLWxJU1ltR3FvdjQuKkFBSlRTUUFDTURFQUFsTkxBQk0yTlRreU9URXdPVFl6T1RjNU5qSTJNVEF3QUFKVE1RQUEqXCIsXCJVc2VyVG9rZW5cIjpcImJvYlwiLFwibG9naW5VUkxcIjpcIi9vcGVuYW0vVUkvTG9naW5cIixcIlByaW5jaXBhbHNcIjpcImJvYlwiLFwiU2VydmljZVwiOlwibGRhcFNlcnZpY2VcIixcInN1bi5hbS5Vbml2ZXJzYWxJZGVudGlmaWVyXCI6XCJpZD1ib2Isb3U9dXNlcixvPXNjb3BlYXosb3U9c2VydmljZXMsZGM9b3BlbmFtLGRjPWZvcmdlcm9jayxkYz1vcmdcIixcImFtbGJjb29raWVcIjpcIjAxXCIsXCJPcmdhbml6YXRpb25cIjpcIm89c2NvcGVheixvdT1zZXJ2aWNlcyxkYz1vcGVuYW0sZGM9Zm9yZ2Vyb2NrLGRjPW9yZ1wiLFwiTG9jYWxlXCI6XCJlbl9VU1wiLFwiSG9zdE5hbWVcIjpcIjEyNy4wLjAuMVwiLFwiQXV0aFR5cGVcIjpcIkRhdGFTdG9yZVwiLFwiSG9zdFwiOlwiMTI3LjAuMC4xXCIsXCJVc2VyUHJvZmlsZVwiOlwiQ3JlYXRlXCIsXCJBTUN0eElkXCI6XCI0OTVjNmVjN2ZjNmQyMWU4MDFcIixcImNsaWVudFR5cGVcIjpcImdlbmVyaWNIVE1MXCIsXCJhdXRoSW5zdGFudFwiOlwiMjAxNi0wNy0xOFQxNToxMjo1NVpcIixcIlByaW5jaXBhbFwiOlwiaWQ9Ym9iLG91PXVzZXIsbz1zY29wZWF6LG91PXNlcnZpY2VzLGRjPW9wZW5hbSxkYz1mb3JnZXJvY2ssZGM9b3JnXCJ9LFwiY2xpZW50SURcIjpcImlkPWJvYixvdT11c2VyLG89c2NvcGVheixvdT1zZXJ2aWNlcyxkYz1vcGVuYW0sZGM9Zm9yZ2Vyb2NrLGRjPW9yZ1wiLFwic2Vzc2lvbklEXCI6bnVsbCxcImNsaWVudERvbWFpblwiOlwibz1zY29wZWF6LG91PXNlcnZpY2VzLGRjPW9wZW5hbSxkYz1mb3JnZXJvY2ssZGM9b3JnXCIsXCJzZXNzaW9uVHlwZVwiOlwidXNlclwiLFwibWF4SWRsZVwiOjMwLFwibWF4Q2FjaGluZ1wiOjMsXCJuZXZlckV4cGlyaW5nXCI6ZmFsc2UsXCJtYXhUaW1lXCI6MTIwfSIgfQ.FSmj5Sn-ibGoqWTCerGBZ-IYVp1V54HVGj5A53Td8Ao

Obviously, this is much larger and looks more complex.  This token is essentially made up of two parts:
1. a fake stateful session identifier
2. a JWT
OpenAM always prepends a fake stateful session identifier to this JWT for backwards compatibility. So, the actual JWT starts *after* the second asterisk (*).  i.e. from the bit that begins eyAidH... right through to the end.

You can use tools like jwt.io and jwtinspector.io to unpack and read this JWT.
e.g, for the JWT above, you can see the payload data which is how OpenAM represents the session information:


Now, turning our attention to the policy evaluation REST calls we see that there is an option to use 'ssoToken' as a parameter to the 'subject' item.

In a realm that uses the default 'stateful' sessions then any policy evaluation REST call that uses the 'ssoToken' parameter should use a stateful session identifier.  The policy will then have full access to the session information as well the profile data of the user identified by the session.

A stateless realm works exactly the same way.  You now need to provide the *full* stateless token (including the 'fake' stateful identifier with the JWT component) and the policy will have access to the state information from the JWT as well as information about the user from the datastore (such as group membership)

For example:
curl --request POST --header "iPlanetDirectoryPro: AQIC5wM2LY4SfcxxJaG7LFOia1TVHZuJ4_OVm9lq5Ih5uXA.*AAJTSQACMDEAAlNLABQtMjU4MDgxNTIwMzk1NzA5NDg0MwACUzEAAA..*" --header "Content-Type: application/json" --data '{"resources":["orders"],"application":"api","subject":{"ssoToken":"AQIC5wM2LY4SfcyRBqm_r02CEJ5luC4k9A6HPqDitS9T5-0.*AAJTSQACMDEAAlNLABQtNTc4MzI5MTk2NjQzMjUxOTc2MAACUzEAAA..*eyAidHlwIjogIkpXVCIsICJhbGciOiAiSFMyNTYiIH0.eyAic2VyaWFsaXplZF9zZXNzaW9uIjogIntcInNlY3JldFwiOlwiN2RiODdhMjQtMjk5Ni00YzkxLTkyNTUtOGIwNzdmZDEyYmFkXCIsXCJleHBpcnlUaW1lXCI6MTQ2ODkzNTgyODUyNSxcImxhc3RBY3Rpdml0eVRpbWVcIjoxNDY4OTI4NjI4NTI1LFwic3RhdGVcIjpcInZhbGlkXCIsXCJwcm9wZXJ0aWVzXCI6e1wiQ2hhclNldFwiOlwiVVRGLThcIixcIlVzZXJJZFwiOlwiYm9iXCIsXCJGdWxsTG9naW5VUkxcIjpcIi9vcGVuYW0vVUkvTG9naW4_cmVhbG09U2NvcGVBelwiLFwic3VjY2Vzc1VSTFwiOlwiL29wZW5hbS9jb25zb2xlXCIsXCJjb29raWVTdXBwb3J0XCI6XCJ0cnVlXCIsXCJBdXRoTGV2ZWxcIjpcIjVcIixcIlNlc3Npb25IYW5kbGVcIjpcInNoYW5kbGU6QVFJQzV3TTJMWTRTZmN3Y3YzMFFJTGF0Z3E3d3NJMWM4RThqRmZkTDMzTlZVQjAuKkFBSlRTUUFDTURFQUFsTkxBQk15TVRNME9USTRPVFk0TmpBNE1qSTFNelF3QUFKVE1RQUEqXCIsXCJVc2VyVG9rZW5cIjpcImJvYlwiLFwibG9naW5VUkxcIjpcIi9vcGVuYW0vVUkvTG9naW5cIixcIlByaW5jaXBhbHNcIjpcImJvYlwiLFwiU2VydmljZVwiOlwibGRhcFNlcnZpY2VcIixcInN1bi5hbS5Vbml2ZXJzYWxJZGVudGlmaWVyXCI6XCJpZD1ib2Isb3U9dXNlcixvPXNjb3BlYXosb3U9c2VydmljZXMsZGM9b3BlbmFtLGRjPWZvcmdlcm9jayxkYz1vcmdcIixcImFtbGJjb29raWVcIjpcIjAxXCIsXCJPcmdhbml6YXRpb25cIjpcIm89c2NvcGVheixvdT1zZXJ2aWNlcyxkYz1vcGVuYW0sZGM9Zm9yZ2Vyb2NrLGRjPW9yZ1wiLFwiTG9jYWxlXCI6XCJlbl9VU1wiLFwiSG9zdE5hbWVcIjpcIjEyNy4wLjAuMVwiLFwiQXV0aFR5cGVcIjpcIkRhdGFTdG9yZVwiLFwiSG9zdFwiOlwiMTI3LjAuMC4xXCIsXCJVc2VyUHJvZmlsZVwiOlwiQ3JlYXRlXCIsXCJBTUN0eElkXCI6XCI2MzE2MDI4YjcyYWU5MWMyMDFcIixcImNsaWVudFR5cGVcIjpcImdlbmVyaWNIVE1MXCIsXCJhdXRoSW5zdGFudFwiOlwiMjAxNi0wNy0xOVQxMTo0Mzo0OFpcIixcIlByaW5jaXBhbFwiOlwiaWQ9Ym9iLG91PXVzZXIsbz1zY29wZWF6LG91PXNlcnZpY2VzLGRjPW9wZW5hbSxkYz1mb3JnZXJvY2ssZGM9b3JnXCJ9LFwiY2xpZW50SURcIjpcImlkPWJvYixvdT11c2VyLG89c2NvcGVheixvdT1zZXJ2aWNlcyxkYz1vcGVuYW0sZGM9Zm9yZ2Vyb2NrLGRjPW9yZ1wiLFwic2Vzc2lvbklEXCI6bnVsbCxcImNsaWVudERvbWFpblwiOlwibz1zY29wZWF6LG91PXNlcnZpY2VzLGRjPW9wZW5hbSxkYz1mb3JnZXJvY2ssZGM9b3JnXCIsXCJzZXNzaW9uVHlwZVwiOlwidXNlclwiLFwibWF4SWRsZVwiOjMwLFwibWF4Q2FjaGluZ1wiOjMsXCJuZXZlckV4cGlyaW5nXCI6ZmFsc2UsXCJtYXhUaW1lXCI6MTIwfSIgfQ.Dnjk-9MgANmhX4jOez12HcYAW9skck-HFuTPnzEmIq8"}}' http://as.uma.com:8080/openam/json/ScopeAz/policies?_action=evaluate

Might return:
[{"advices":{},"ttl":9223372036854775807,"resource":"orders","actions":{"permit":true},"attributes":{}}]

Assuming the policy looks something like this:


...and, in this specific case, that the authentication level for the 'subject' of the ssoToken is set to two or greater, as well as the 'subject' being a member of the the 'api_order' group in the datastore.

Next up, we'll look at using OIDC tokens in the subject parameter of the REST call.